- AVIFRate
- ArDUMPino - Game cartridge ROM reader based on Arduino
- BT2VEC - XBOX One (Bluetooth) controller adapter for the Vectrex
- Ferramenta rombank para o "A GameBoy Emulator (agbe)"
- Ferramentas Java para imbNES com Linux
- IM Café
- KBD2SNES Adapter
- LinuxCrypt
- ListaTelemarMobile
- MCMania
- MD2PCE - Sega Genesis controller adapter for TG16/PC-Engine and USB
- PSX RetroPad Adapter
- PSX2VEC - Playstation controller adapter for the Vectrex
- RetroFi Adapter - Low-Latency 2.4G Wireless Multiplayer Joystick Adapter
- RetroPad32 Adapter
- RetroPad32 Multi-Out Add-on Board
- RetroPad32 USB Input Module
- RetroVGA Scanlines Generator
- SGCExplorer - Sega Genesis Cartridge Explorer
- STM32 HID Bootloader
- Simple Disk Catalog .Net
- SimpleFE - Simple Emulator FrontEnd
- USB RetroPad Adapter
- USB2Classic Adapter
- Wii RetroPad Adapter 2
ArDUMPino - Game cartridge ROM reader based on Arduino
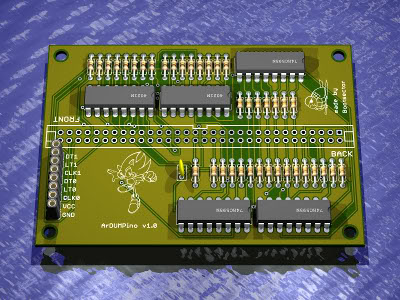
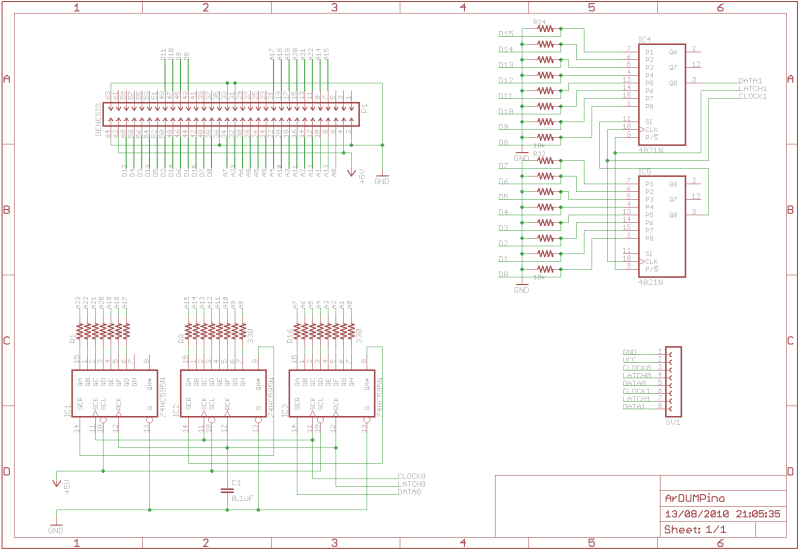
Introduction I just got introduced to Arduino, the microcontroller that's easy to use, has a great community and the support material found on internet is very vast. This little beauty, and the knowledge that I've acquired while learning to use it, allowed me to create a device that I always wanted to create since I was 19 years old: a videogame cartridge reader! The main reason I choose Sega Genesis cartridges it's because I got very familiar with it by reading the documentation of an old cartridge dumper called "Game Medic". Game Medic originally used the PC parallel port and, because of its limitations, more ICs were necessary to build the whole circuit. Arduino turns any external world interfacing with your PC a breeze, so that's why I've used it for this project: ArDUMPino! The Sega Genesis cartridge ROM Description below was adapted from the Game Medic documentation: The average Sega Genesis/Megadrive cartridge consists of a ROM chip and sometimes a battery backed up static ram chip. The signals to and from the cartridge are all CMOS level (rail to rail voltage swings) and therefore all chips which interface to a cartridge or the Genesis/Megadrive should be CMOS compatible parts. The Sega Genesis uses a CMOS variant of the Motorola 68000. Therefore, there are 16 data lines and 23 address lines at the cartridge slot. Sega cartridges almost exclusively use a single mask programmed 16 bit wide ROM chip in their cartridges, but third party manufacturers sometimes use multiple (sometimes 8 bit wide) ROM chips. Therefore, reading a Genesis cartridge consists of asserting the address and chip select lines low, setting the address lines to the address you want to read and reading the data of the data lines. The pinouts for the cartridge port is as follows: When standing in front of the Genesis, b is frontward, a is rearward, *=active low a1 - gnd b1 - a2 - +5v b2 - a3 - A8 b3 - a4 - A11 b4 - A9 a5 - A7 b5 - A10 a6 - A12 b6 - A18 a7 - A6 b7 - A19 a8 - A13 b8 - A20 a9 - A5 b9 - A21 a10 - A14 b10 - A22 a11 - A4 b11 - A23 a12 - A15 b12 - a13 - A3 b13 - a14 - A16 b14 - a15 - A2 b15 - a16 - A17 b16 - *OE a17 - A1 b17 - *CS a18 - gnd b18 - *AS a19 - D7 b19 - a20 - D0 b20 - a21 - D8 b21 - a22 - D6 b22 - D15 a23 - D1 b23 - D14 a24 - D9 b24 - D13 a25 - D5 b25 - D12 a26 - D2 b26 - a27 - D10 b27 - *RESET a28 - D4 b28 - *WE a29 - D3 b29 - a30 - D11 b30 - a31 - +5v b31 - a32 - gnd b32 - gnd ArDUMPino: How it works! Given all the information about the Sega Genesis ROM cartridge above, all we need to do in order to read the contents of a ROM chip, in a nutshell, is the following (and this theory is pretty much the same and applicacable for reading any ROM chip): :. Assert the Address (*AS) and Chip Select (*CS) low (active) :. Set the Address Lines (A1 to A23) to the address we want to read :. Read data from the Data Lines (D0 to D15) Please note that the data bus has a 16-bit width, so every address will give you back 16 bits of data. Therefore, in order to read a 8 megabits (1 megabyte) cartridge (Sonic 2, for instance), the address line should range from 0 to 524287 and you should read 2 bytes (16 bits) of data at every iteration. This is exactly what ArDUMPino does! It basically reads data from the cartridge and outputs them to the Serial interface. All the "intelligence" is inside the Arduino itself, which is running the Schetch (this is how we call Arduino programs) that contains all the ROM reading logics and a Serial interface, making it "controllable" via serial interface. The ArDUMPino client PC program is simply a "dumb terminal" which simply sends ArDUMPino commands and retrieve the output from it, saving all the data in a binary file (ROM file). The Hardware ArDUMPino hardware is made of two main components: :. The Arduino board :. The Sega Genesis cartridge board (custom made) The Arduino board is easy to buy online. I bought mine from http://www.sparkfun.com/ and I really recommend them! The Sega Genesis board is a custom made board that is made of the following components: :. 1x 64 pin Genesis cartridge slot connector (I bought mine from TotoTek) :. 3x 74HC595N Serial In/Parallel Out shift registers :. 2x CD4021B Parallel In/Serial Out shift registers :. 23x 330 ohms resistors :. 16x 10k ohms resistors :. 0.1 microFarad capacitor (ceramic) The schematics goes below:
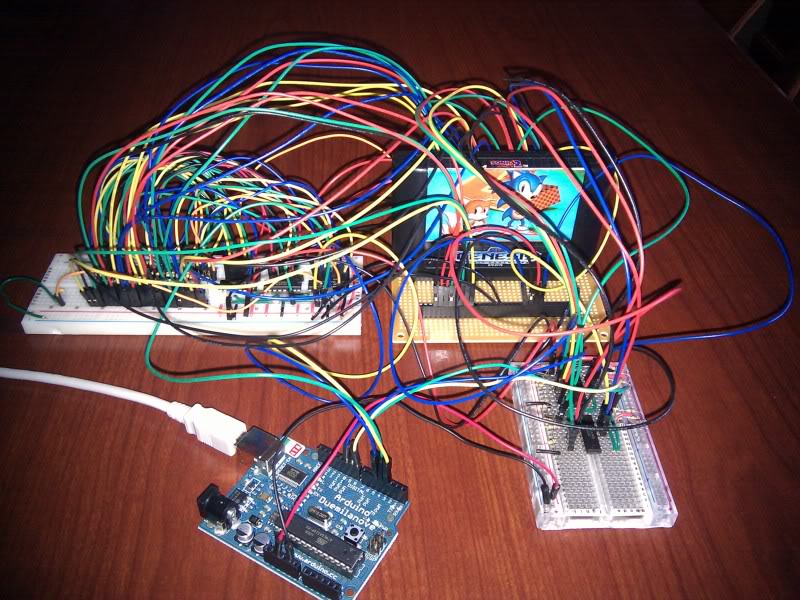
The shift registers are used as "expanders" for Arduino, adding 16 input pins acting as the data bus (2x CD4021B) and 23 output pins acting as the address bus (3x 74HC595N ). You can get more information about Arduino and ShiftIn and ShiftOut procedures here and here respectively. Here's a picture of a rather ugly (but functional) implementation of the schematics using protoboards! :)
The Software ArDUMPino's software part is made of two main components: :. ArDUMPino Sketch :. ArDUMPino Client The ArDUMPino sketch is the C program that runs inside the Arduino board. For a quick intro about Arduino and how to program it, please refer to the Arduino's Official Website. It is responsible for receiving commands from the serial interface (sent by the ArDUMPino client application) and output ROM data to serial (which is captured by the client application). Currently, the two most important functions implemented by the ArDUMPino sketch and that are often used by the client application are: :. GET_GENESIS_ROMSIZE - It returns a string which is the integer representation of the cartridge ROM size, in bytes. This information is read from addresses 0xD2 and 0xD3. These four bytes are the final addresses used by the ROM. :. READ_GENESIS_ROM - Makes the Arduino read all ROM bytes and output then to the serial interface The sketch code was created in a matter that will be very easy to implement support for other cartridges. Super NES support is really easy to implement by using pretty much the same circuit. The reason I didn't do this yet it's because I could not find a SNES slot connector and a cartridge. Game Medic documentation even has an explanation about how to achieve this. The ArDUMPino Client part, as mentioned, is a much simpler program that simply send commands to the Arduino and saves the received bytes. It was created using Lazarus, an opensource and multi platform FreePascal IDE/Compiler. The library used for getting serial port support was SynaSer. Here's a screenshot of the ArDUMPino Client program reading the Sonic 2 cartridge from my protoboard prototype:
Downloads Schematics, binaries, sources and documentation used during ArDUMPino creation can be downloaded from http://code.google.com/p/ardumpino/ Final Thoughts This is my first Arduino related project. I'm a newbie in electronics, including microcontrollers and Arduino itself. Suggestions are welcome! I still wonder if it's possible to speed up the read process: Dumping a 16 megabits cartridge takes about 6 minutes. Not sure whether this is considered normal or too slow. That's it! Happy dumping! Enjoy! Bruno |
|||